Webサイトのパフォーマンス改善
社内の勉強会でHTTP/2とかパフォーマンスについて話したのでまとめた。
見た情報
HTTPの仕組みからパフォーマンス改善の取り組みまで詳細に説明している。基本的にはこの本を一冊読めばそれで十分なんじゃないかと思った。
英語版はWebで見れる。High Performance Browser Networking
Lara Callender Hoganさんのサイト。なぜパフォーマンスを改善しないといけないかについて調査結果がまとまっている。
パフォーマンスを測定できるサイト
PageSpeed Insights コンテンツを解析し、どこを改善すべきか教えてくれる。
DNSルックアップやTCPの3ウェイハンドシェイクなど、どこでどれぐらい時間が掛かっているかを可視化してくれる。 TCPのコネクション単位での表示もしてくれるので、それでボトルネックがわかることもあると思う。
Magit入れたEmacsでgit rebase -iしたら便利だった
masterから生やしたトピックブランチで下のコマンドを打ち込むとブランチの分岐点からのコミットを対象にしたrebase -iを実行できる。
git rebase -i --keep-empty --autosquash $(git show-branch --merge-base master HEAD)

squashしたい行の先頭でfを入力するとfixupに書き換えてくれる。

同僚5人ぐらいに説明したけど誰も共感してくれなかった。
Emacsにyasnippet入れた
設定
設定ファイルに以下を追加。
(unless (package-installed-p 'yasnippet)
  (package-refresh-contents) (package-install 'yasnippet))

(add-to-list 'load-path "~/.emacs.d/yasnippet")
(require 'yasnippet)
(yas-global-mode 1)
AndreaCrotti/yasnippet-snippets · GitHub
上記から必要なsnippetをダウンロードし、~/.emacs.d/yasnippet以下に保存。
これでyasnippetが有効になる。
今回はscala-modeだけを入れてみた。
使い方
scala-modeが有効になっている時にsnipetで設定されているキーワードを入力し、TABキーを押すと残りの部分が補完される。
例
バッファでfor と入力しTABキーを押す
補完の選択肢がミニバッファに表示される

選択するとバッファに挿入される

FluxxorとReact RouterでFluxのサンプル作った
作ったプロジェクト
構成
Fluxxor
React Router
React.js
Play 2.4
Slick 3.0
Fluxとは
Fluxとはアーキテクチャの名前。React.jsはFluxアーキテクチャのViewの実装にあたる。
以下geta6さんのスライドがわかりやすかった。各コンポーネントの説明もされている。
facebookによるfluxの説明。
Fluxxor版の全体像。
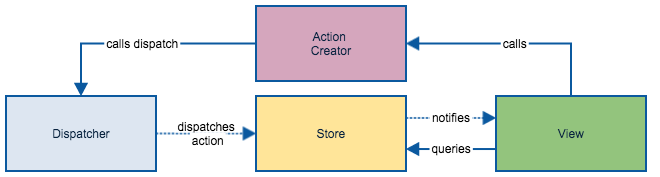
今回は上記に加えてReact Routerを使った。
ルーターの設定
https://github.com/saito400/play2.4-flux-demo/blob/master/app/views/routes.jsx
var React = require("react"),
    Router = require("react-router"),
    Route = Router.Route,
    DefaultRoute = Router.DefaultRoute;

var Navi = require("./common/components/navi_view.jsx"),
    TodoType = require("./todo/components/todo_type.jsx"),
    Todo = require("./todo/components/todo.jsx");

var routes = (
  <Route handler={Navi} name="home" path="/">
    <Route handler={Todo} name="todo" path="/todo" />
    <Route handler={TodoType} name="todo-type" path="/todo-type" />
  </Route>
);

module.exports = routes;
ビルド
JSXファイルはそのままブラウザで実行できない為、JavaScriptに変換する必要がある。
React.jsのブログでアナウンスされている通り、react-tools と JSTransformが廃止され、今後はJSXはBabelでコンパイルする形になる。なので今回はBabelを利用した。
またCommonJS方式のモジュール管理の解決の為、Browserifyを利用し、タスクランナーにgulpを使った。
https://github.com/saito400/play2.4-flux-demo/blob/master/gulpfile.js
var browserify = require('browserify');
var babelify = require('babelify');
var gulp = require('gulp');
var source = require('vinyl-source-stream');
var buffer     = require('vinyl-buffer');
var sourcemaps = require('gulp-sourcemaps');
//var uglify = require('gulp-uglify') // comment out for now because it takes too much time
var watchify   = require('watchify');
var handleErrors = require('./handleErrors');

gulp.task('build', function() {
    return watchify(browserify({ entries: './app/views/app.jsx', debug: true }, watchify.args))
        .transform(babelify)
        .bundle()
        .on('error', handleErrors)
        .pipe(source('bundle.js'))
          .pipe(buffer())
          .pipe(sourcemaps.init({ loadMaps: true  }))
//          .pipe(uglify())
          .pipe(sourcemaps.write('./'))
        .pipe(gulp.dest('./public/javascripts/'));
});

gulp.task('watch', function(){
  gulp.watch('./app/**/*.jsx', ['build']);
});
https://github.com/saito400/play2.4-flux-demo/blob/master/package.json
{
  "name": "play2.4demo",
  "version": "1.0.0",
  "description": "Demo application of play 2.4 and slick 3",
  "main": "index.js",
  "directories": {
    "test": "test"
  },
  "scripts": {
    "build": "$(npm bin)/browserify --debug app/views/app.jsx -t babelify -o public/javascripts/bundle.js",
    "watch": "gulp watch"
  },
  "author": "",
  "license": "",
  "devDependencies": {
    "babelify": "^6.1.2",
    "browserify": "^10.2.4",
    "fluxxor": "^1.6.0",
    "gulp": "^3.9.0",
    "gulp-notify": "^2.2.0",
    "gulp-sourcemaps": "^1.5.2",
    "gulp-uglify": "^1.2.0",
    "gulp-util": "^3.0.6",
    "lodash": "^3.10.0",
    "react": "^0.13.3",
    "react-router": "^0.13.3",
    "tcomb-form": "^0.4.8",
    "vinyl-buffer": "^1.0.0",
    "vinyl-source-stream": "^1.1.0",
    "watchify": "^3.2.3"
  }
}
開発中は rpm run watch を実行し、jsxファイルに変更があったら自動でコンパイルされるようにした。
BabelがES6のトランスパイラなので、ついでにES6のアロー関数を使った。
ES6のアロー関数
mapはこんな感じで書ける。
var options = this.state.todoTypes.map(x => <option value={x.id}>{x.title}</option>);
filterはこんな感じ
this.todoTypes = this.todoTypes.filter(x => x.id != id);
感想
コードの記述量は結構多い。ただ以下twadaさんのツイートにあるように、複雑な設計でも対応できるように感じた。
React でクライアントサイドのプログラミングパラダイムがぐっとシンプルになり、破綻せずに多様な要件に挑戦できるようになった。結果として管理すべき複雑さは「おかわり」され、結局プログラミングの複雑さはコントロールできる限界まで増える (Excel に近づいてゆく画面を見ながら)
— Takuto Wada (@t_wada) April 2, 2015あと以下naoyaさんのスライドにある通り、記述量は多くなるけどブラックボックス化しにくいと思うので保守は比較的楽だと思う。
TODO
サーバサイド
Play 2.4とSlick 3.0を使った。
あとで何か書く。
Testing
後で調べる。
validation
以下のようにするのが良いらしいだけどまだ試してない。後で試す。
間違ってる所とかあったら教えてください。
Emacsの設定 2015年5月版
設定ファイル全体は以下
インストールしている主なパッケージ
helm
helm-miniは以下の通り設定した。これでhelm-miniのリストに現在のバッファ、最近開いたファイル、カレントディレクトリのファイル、gitの同一リポジトリのファイルが表示される。
;; helm-mini
(progn
  (require 'helm-ls-git)
  (custom-set-variables
   '(helm-truncate-lines t)
   '(helm-delete-minibuffer-contents-from-point t)
   '(helm-mini-default-sources '(helm-source-buffers-list
                                 helm-source-recentf
                                 helm-source-files-in-current-dir
                                 helm-source-ls-git
                                 ))))
helm-ls-git
↑のhelm-miniのリストにgitのファイルを表示する為にインストールした。Emacs起動後に一度手動で起動しないとhelm-miniのリストに出てこない気がするけど今の所大きな問題ではないのでそのままにしてる。
Ensime
Scala用。補完や定義へのジャンプなどができるようになる。
web-mode
htmlとかjavascript書く時に利用。
auto-complete
補完用。便利。
ScalaからElasticsearchにアクセスするサンプル
VagrantでVM上にElasticsearch環境を構築し、そこに対してScalaでアクセスするサンプルを作った。
作ったファイル
環境
Vagrant 1.7.2
VirtualBox 4.3.26
Mac OSX yosemite 10.10.3
環境構築
Elasticsearchは以下のリポジトリ内のelasticsearchを使った。設定済みなので楽
vagrant upしたら/sbin/mount.vboxsf: mounting failed with the error: No such deviceというエラーが出たので以下の対応を実施
ホスト側 $ vagrant plugin install vagrant-vbguest
ゲスト側 $ sudo yum -y install kernel kernel-devel
ホスト側 $ vagrant reload
これでlocalhost:9200でElasticsearchにアクセスできる。
Elasticsearchにインデックスとドキュメントタイプを作成
インデックスとドキュメントタイプを作成しドキュメントを登録
curl -XPOST 'http://localhost:9200/twitter/tweet/' -d '{ "user" : "John Doe", "message" : "trying out Elasticsearch" }'
インデックスを確認
curl 'localhost:9200/_cat/indices?v'
検索
curl -XGET 'localhost:9200/_search'
Scala側の実装
ScalaでElasticsearchにアクセスする部分は以下のライブラリを使った。
READMEが詳細なので説明は割愛。
Emacs+EnsimeでScala開発環境を作った
動機
最初はIntelliJを使ってましたが、以下の理由でEmacs+Ensimeを使いはじめました。
・IntelliJが重く感じた
・マウスを使いたくなかった
環境
・Mac OSX Yosemite
・Emacs 24.5
構築
Scala+sbt
brew install sbt
Emacs
scala-mode2+Ensime
~/.emacs/init.elに以下の記述を追加しEmacsを再起動
(require 'package)
(add-to-list 'package-archives '("melpa" . "http://melpa.milkbox.net/packages/") t)
(add-to-list 'package-archives '("marmalade" . "http://marmalade-repo.org/packages/"))
(package-initialize)

(unless (package-installed-p 'scala-mode2)
(package-refresh-contents) (package-install 'scala-mode2))
(unless (package-installed-p 'ensime)
(package-refresh-contents) (package-install 'ensime))


(setenv "PATH" (concat "PATH_TO_SBT:" (getenv "PATH")))
(setenv "PATH" (concat "PATH_TO_SCALA:" (getenv "PATH")))


(require 'scala-mode2)
(require 'ensime)
(add-hook 'scala-mode-hook 'ensime-scala-mode-hook)
sbt pluginの設定
~/.sbt/0.13/plugins/plugins.sbtに以下を追加
resolvers += Resolver.sonatypeRepo("snapshots")

addSbtPlugin("org.ensime" % "ensime-sbt" % "0.1.5")

// project/plugins.sbt
dependencyOverrides += "org.scala-sbt" % "sbt" % "0.13.8"
プロジェクト毎のEnsime用設定ファイル生成
プロジェクトのディレクトリに移動し以下コマンドを実行
sbt gen-ensime
Ensimeを起動
Emacs起動後に以下を実行
M-x ensime
Emacs+Ensimeの感想
・キーボードだけで大体コーディングできるから楽
・補完もIntelliJのが良いと思うけどあんま気にならない
・作ってるのが小さいシステムなので今の所問題無いが、大規模になったらどうなるか不明